
 English
  Spanish
  Portuguese
  German
  Italian
  Japanese
  French
  Polish
  Russian
  Netherlands
  Hungarian
  Turkish
  Videos
  Pickleball Kitchen
Changing your pickleball paddle grip is a normal and routine activity that you’ll be doing regularly throughout your pickleball journey. In order to get the best use out of your paddle, it’s important to make sure that the grip is clean, high quality and tacky. It will help you to worry less about your paddle grip and more about your skills and performance on the court.
Over-gripping or replacing the grip of you pickleball paddle is an easy process, but it can take a few times to get used to. If you’ve been thinking about changing up your grip, then you’ve come to the right place.
Video tutorial
When should you change your grip?
You should change your paddle grip if any of the following occur:
- The grip is starting to feel silky instead of tacky.
- You notice the grip twisting in your hand after driving or smashing the ball. Keep in mind this can also be a sign that you’re using a grip that’s too small.
- You accidentally let go of the paddle and it flung across the court like some deathly boomerang.
- You just want to because it sounds fun.
There’s nothing wrong with regripping your paddle for fun. I’ve done it many times!
But you’re probably here because your paddle has lost all of its tackiness and you want that great feeling back. I understand. Unfortunately, the lifespan of a tacky grip is quite low. Based on what I’ve experienced, my grips lose their tackiness after around 100-150 hours of total play time. This a rough estimate and could vary based on your own experience. In other words, you’ll be changing your grip a lot if you want that great tacky feeling in your hands all the time.
You don’t have to change the grip entirely though. Applying an overgrip to your paddle handle is another great option for getting the tackiness back. This is an even better option if you want to thicken the grip slightly. By doing this, you won’t have to replace the grip entirely. This is what I typically do.
I’ll be showing you how to do both options today. Let’s start with how to change your grip.
Step-by-step guide to changing your paddle grip
Before you begin, it’s best if you buy two regrips instead of one in case something goes horribly wrong. It’s OK to mess up because most of the times you can just take it off and retry, but it’s nice to have another laying around just in case. If you need help picking which grips or overgrips to get, scroll down to the bottom for some recommendations. In general, Gamma is the way to go.
Step 1: Get your workspace set up
It’s nice to have everything organized before you begin changing your grip. You will need the following:
- Sharp scissors. Kitchen shears work very well.
- The grip itself.
- Patience
It can be frustrating changing a grip for the first time but stick with my steps and I’ll get you through it.
Here’s the grip that I’ll be using today.


Whichever grip brand you end up going with will most likely come with a half-inch electrical tape band that has their brand name on it. In my case, it’s the Gamma band that you see above. Just remove the band, and stick it on the side of your table. This tape is used to hold the top of the grip in place. You’ll need this later. Unravel the grip, then move onto the next step.
Step 2: Remove the previous grip
It’s time to ruin that old grip of yours! Start by taking the half-inch electrical tape off at the top of the handle. Start peeling the grip off and all the way down the handle. You may have some residue or sticky material leftover on the handle. Just pull that off as well. Don’t worry if it’s not perfect. Your paddle will look weird after you’re done. Like this:

The paddle is bare and we’re ready to apply our grip!
Step 3: Start simple
Ok, here’s where things get interesting. But we’re just going to start simple so that you can get used to how this works. Start by observing both ends of your new grip tape.
Depending on what brand you’re using, one end of the tape may look like this:

But another end will be tapered like this:

The tapered end that you see above is going to be what starts off the gripping process. This end will be placed at the bottom of the handle and will work its way up to the top.
Before you stick the tape on, check the brand name of the tape located somewhere in the center. Make sure it’s not upside down!
Remove the adhesive strip on the back of your tape, then apply the small end shown above like this:

Make sure that the tape is firmly stuck to the bottom of the handle. Also, notice how the tape is pretty much flush with the very bottom. If you’re worried that you’ll run out of tape, don’t worry, they give you plenty of room to work with.
The key to applying grip tape successfully is to make sure that your positioning is correct, while also maintaining tightness. You don’t want to apply the tape lightly to the handle. You should be pulling it tight every time you make a revolution. This is easy to do if your grip is thick and stitched like the one I’m using today.
Make one revolution like you see below.

Cool, you have your first bit of grip applied! Now comes the more coordinated part.
Step 4: Grip up the whole handle
We’re now going to grip all the way up the handle. The problem here though is that we’ve been applying the grip by going straight horizontally and not diagonally upward. So it’s time to change directions! Check out this image:
![]()
In the first pane, you see the grip changing directions and moving at an upward angle. This is what will make the grip flat and comfortable. If you can see the lines from the previous grip you can just follow those. But if you can’t then just keep wrapping the grip around until you get the angle right.
Your grip will most likely have perforated holes in it like mine does. A great strategy to use when gripping you paddle is to follow the imaginary line that the holes make. In the second pane of the image above, you can see how I’ve applied the grip one revolution upward. Notice how I’m not covering up the holes below. This is important. Those holes help to absorb moisture from your hand. Eventually, as you tape the grip upward it will become a natural process and you’ll be at the top before you know it. The important part is getting that angle right at the very beginning. Once you have that, you’re golden.
Make sure you’re pulling tight enough. You don’t want to pull so tight that you’re stretching the grip, but it needs to fit tightly on there.
Step 5: Cut the grip and tape it off
Now that you’ve got the grip at the top of the handle, it’s time to cut off the excess and tape it. Some kitchen shears or sharp scissors will work fine here. Make sure you give yourself plenty of room to work with when you’re cutting. Cut just like you see the green line below.

Cut from the bottom of the tape to the top. Make sure that the angle is shallow. If you cut it too steep then you may not be able to wrap it around all the way. Once you’re done cutting, wrap the tape all the way around. Remember that half-inch tape that you stuck on the side of your table earlier? You’re now going to wrap that around the grip at the top in order to hold everything in place.
Nice, now you have a completely regripped paddle! Awesome!
Over-gripping your paddle
If you don’t want to change your grip, but need some extra thickness or tackiness, over-gripping can be a great option for you. Like the name applies, an overgrip gets applied directly to the grip you already have. This is my preferred method of adding tackiness to my paddle grip.
Also, depending on what brand you buy, overgrips can come in a wide array of colors. There’s nothing wrong with spicing up your grip!
Applying an overgrip to the paddle isn’t much different than changing the grip entirely. The thing about overgrips is that they have one piece of adhesive near the tip of the strip. The rest of it isn’t adhesive. This means that over-gripping your paddle is much more forgiving than replacing it entirely because if you mess up you can easily redo it.
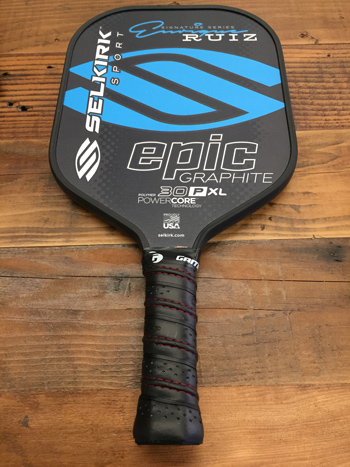
However, it can be harder to make the grip uniformly tight. I had to have someone take these pictures for me because I wasn’t able to take my hands off my paddle. Today I’m going to show you how to overgrip your paddle. The one I’m over-gripping today is the Selkirk AMPED Epic.
Here’s the overgrip tape that we’re using today. Just unravel it, set the sticky tape aside, and you’re set to go!


I’m not going to repeat the step-by-step guide that I wrote about above, but you can follow the same principles.
Overgrip tape is much more flexible than regular grip tape. Considering this, you will need to pull the tape much tighter than you would with a regular grip change. This is really important because you don’t want random bulges sticking out of your handle.
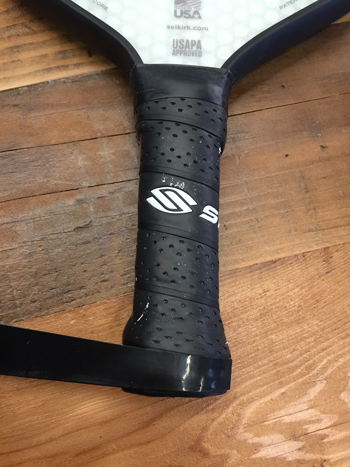 Here’s what the first revolution looks like. I pulled very tight on the tape as I was wrapping it around.
![]()
Just like the first example above, I slowly and tightly made my way up the paddle. The cool thing about the Gamma overgrip that I use is that it’s already tapered at the top. So depending on the length of your paddle, you may not have to cut it off at the top. If you do, just follow the advice earlier in the article, then tape it off. Now you’ve got a paddle that is much tackier!
Best brands for grips and overgrips
Gamma is widely known as the best manufacturer for grips in the pickleball world. Their grips are extremely well-made, tacky, durable and come in different types and colors. For both grips and overgrips, I recommend Gamma the most. They have different types of regular grips to choose from in case you don’t like the one I used above. Also, their overgrips come in white, black, and a set of 3 neon colors. Check them out online for more information.
The runner-up to my Gamma recommendation would be ProLite. They have a wide range of grips available, as well as a whole host of different overgrip colors. Also, their overgrips come in a thinner version in case you need the tackiness, but not the thickness or “squishiness”.
Wrapping up the wrapping lesson
As you can see, regripping your paddle isn’t difficult. Well, at least until you get used to it. What grips have you used in the past? Do you have any other recommendations besides Gamma and ProLite? Let me know in the comments below!
Anuncie Aqui / Advertise Here
Sua marca para o mundo Pickleball! / Your brand for the Pickleball world!


 English (US) ·
  Portuguese (BR) ·